Overview of geppy for Gene Expression Programming (GEP)
In this tutorial, we give an overview of geppy for gene expression programming (GEP). Readers should first get familiar with basic GEP concepts and related terminology in the Introduction to gene expression programming tutorial. Besides, since GEP and GP (genetic programming) target the same applications, it is also suggested to refer to the GP tutorial in DEAP.
In a typical GEP application, we first choose the building blocks, i.e., functions, terminals as well as the input variables, to form a primitive set. Then, we create the initial population to be evolved and specify how to evaluate each individual’s fitness. Additionally, we need to define the genetic operators, including selection, mutation and crossover (recombination). All these procedures are presented in the following with geppy.
Specify the primitive set
Unlike genetic programming, in GEP we mainly focus on loosely typed computations. That is, loosely typed GEP does not enforce a specific data type for the nodes in the expression tree. Currently, the PrimitiveSet class only supports loosely typed GEP in geppy. Let’s consider the following syntax tree.
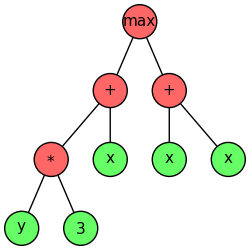
We may need functions \(+, *, max\) and terminals \(3, x, y\). The following code defines such a primitive set:
import geppy as gep
import operator

pset = gep.PrimitiveSet('main', input_names=['x', 'y'])
pset.add_function(max, 2)
pset.add_function(operator.add, 2)
pset.add_function(operator.mul, 2)
pset.add_constant_terminal(3)
We first create a primitive set by initializing the class PrimitiveSet , whose arguments are the name of the primitive set itself and the names of the input variables respectively. By specifying the input variables’ names, terminals for such inputs will be created automatically. The next three lines add two functions using the add_function() method by specifying the function itself and its arity (i.e., number of arguments this function can accept). Finally, we add a constant terminal for the value 3.
Note
Compared with the naming style of DEAP, geppy more strictly respects the PEP 8 recommendations: lowercase with words separated by underscores.
We may check the functions and terminals stored in this primitive set by accessing the functions and terminals properties. For example,
for t in pset.terminals:
    print(t)
produces the following output:
x
y
3
Creation of individuals and population
Define the fitness and individual types
In GEP, an individual is called a chromosome, which is composed of one or more genes. Accordingly, geppy provides the class Chromosome and Gene. Additionally, according to the tradition of DEAP, an individual should have a fitness property, whose type should be a subclass of deap.base.Fitness. More details about fitness and individual can be found in the DEAP tutorail Creating Types. In short, the following code creates an individual type in GEP.
from deap import creator, base

creator.create("FitnessMax", base.Fitness, weights=(1,))
creator.create('Individual', gep.Chromosome, fitness=creator.FitnessMax)
The deap.creator.create() is just a short way to define a class. For example, here we first define a FitnessMax class, which derives the deap.base.Fitness class with a class attribute weights. More specifically, weights=(1,) indicates that our problem has only one objective and we aim to maximize this objective. Similarly, the type of individuals in GEP is the dynamically created Individual class, a subclass of Chromosome with an additional attribute fitness to store an individual’s fitness information.
Hint
When creating a simple class within DEAP or geppy, it is more concise to use deap.creator.create(). Equivalently, you may also just define a class in the traditional Python way. Generally, if the class is a little complicated, the latter way is preferred for readability. For example, the above creator.create('Individual', gep.Chromosome, fitness=creator.FitnessMax) is equivalent to
class Individual(gep.Chromosome):
        def __init__(self, gene_gen, n_genes, linker=None):
                super().__init__(gene_gen, n_genes, linker)
                self.fitness = creator.FitnessMax()
Creating individuals and population
In DEAP, the tradition is to register all the involved operations including individual/population creation, selection, genetic modification and recombination, etc. into a deap.base.Toolbox object for convenient usage later. Under the hood, it is just partial binding of functions in Python. By registering such operators to the toolbox, we can make full use of the DEAP infrastructure. Supposing for our application the head length of each gene is \(h=7\) and each chromosome contains two genes, the following code shows how to create a population of such individuals
from deap import tools

h = 7   # head length
n_genes = 2
toolbox = gep.Toolbox()

toolbox.register('gene_gen', gep.Gene, pset=pset, head_length=h)
toolbox.register('individual', creator.Individual, gene_gen=toolbox.gene_gen, n_genes=n_genes, linker=operator.add)
toolbox.register("population", tools.initRepeat, list, toolbox.individual)
Specifically, we bind the two arguments of Gene __init__() and register the partially bound initializer as gene_gen in the toolbox. Now since all the two arguments of the Gene initializer __init__() have been bound, we can simply call g = toolbox.gene_gen() to generate a new gene g of class Gene. Following the same idea, it is straightforward to understand the individual registration: we also bind all the arguments of Chromosome __init__(). Particularly, the linking function is operator.add(), whose arity is 2. Note that the linking function’s arity is required to be equal to the number of genes n_genes in a chromosome.
Note
Currently in geppy, the linking function linker of a Chromosome is separated from the primitive set. That is, there is no need to add such a linking function into the primitive set.
Finally, the population is just a list of individuals generated by the DEAP function deap.tools.initRepeat(). Note that deap.tools.initRepeat() actually requires two arguments: func and n. Here, only the func argument is bound to toolbox.population, while the `n is still not bound. Thus, when we need to initialize a population of size 100, we should use pop = toolbox.population(n=100). Of course, you can also bind the n argument here if you like.
Evaluation of individual fitness
How to determine the fitness of a certain individual in evolutionary computation is totally problem dependent. In GEP theory, the linear chromosome is first translated (expressed) into an expression tree like the one at the beginning of this tutorial. Such an expression tree in fact represents a computer program, or more commonly, a mathematical expression, which can be executed and evaluated given the input values. Such a genotype to phenotype decoding process is achieved by the compile_() function in geppy. Given an individual of type (or subclass of) Chromosome, the following code compiles the individual into a Python lambda expression
lambda_expr = gep.compile_(individual, pset)
For a chromosome individual encoding the expression tree shown above, it will be compiled into a lambda as lambda x, y: max(y * 3 + x, x + x). Now with such a lambda available, we can easily evaluate its fitness by inserting concrete input values. For convenience, we usually first bind the pset argument of compile_() by registering it in the toolbox
toolbox.register('compile', gep.compile_, pset=pset)
Then, a typical evaluation function can be defined by
def evaluate(individual):
        func = toolbox.compile(individual)
        # inserting x and y into func and
        # compute the fitness of this individual
        # ....
        return fitness,
Note that the above evaluation returns a tuple of one element. This is because in DEAP the single objective optimization is considered to be a special case of multiple objective ones, i.e., the fitness value is a tuple of one element, which is also consistent with weights=(1,) when we define the fitness class. Overall, our aim is to maximize the single objective.
Tip
In many problems like symbolic regression, we may want to minimize the objective such as the loss function. In this case, just set weights=(-1, ) for minimization purpose.
Similarly, we register the evaluation procedure into the toolbox
toolbox.register('evaluate', evaluate)
Hint
In the above line of code, we register a function evaluate into the toolbox but with no argument binding. The main purpose is to make use of the built-in algorithms in geppy. For example, the gep_simple() requires the toolbox to have certain attributes including evaluate.
Register selection, genetic modification and recombination operators
In common evolutionary algorithms, a selection operator is used to select parents to breed offspring based on their fitness and another two operators including mutation and crossover are required to change the individuals for efficient solution space exploration. In GEP, there are more operators specially designed for such a linear representation, like inversion and transposition. To adapt the toolbox paradigm better to GEP, our Toolbox class has obtained its own features apart from inheriting the deap.base.Toolbox class. Most significantly, both the genetic operators and their associated probability (if any) should be registered into the toolbox. Besides, compared with deap.base.Toolbox, there are no strict requirements on the naming of these operators during registration to be compatible with the builtin algorithms. In short, the mutation-like operators should have an alias starting with mut, while the crossover-like operators should be given an alias starting with cx. To explore more details on custom operator design and registration, please refer to the Conventions of genetic operator design and registration in geppy tutorial.
In a typical GEP program, the following operators are registered in the toolbox
toolbox.register('select', tools.selRoulette)

## general mutations whose aliases start with 'mut'
# We can specify the probability for an operator with the .pbs property
toolbox.register('mut_uniform', gep.mutate_uniform, pset=pset, ind_pb=2 / (2 * h + 1))
toolbox.pbs['mut_uniform'] = 1
# Alternatively, assign the probability along with registration using the pb keyword argument
toolbox.register('mut_invert', gep.invert, pb=0.1)
toolbox.register('mut_is_ts', gep.is_transpose, pb=0.1)
toolbox.register('mut_ris_ts', gep.ris_transpose, pb=0.1)
toolbox.register('mut_gene_ts', gep.gene_transpose, pb=0.1)

## general crossover whose aliases start with 'cx'
toolbox.register('cx_1p', gep.crossover_one_point, pb=0.1)
toolbox.pbs['cx_1p'] = 0.4   # just show that the probability can be overwritten
toolbox.register('cx_2p', gep.crossover_two_point, pb=0.2)
toolbox.register('cx_gene', gep.crossover_gene, pb=0.1)
Hint
Now it is clear that the toolbox design of geppy is very flexible and versatile. For instance, you can provide your own genetic operators like toolbox.register('mut_own_invert', my_own_invert), and the builtin algorithms in geppy remains compatible with the toolbox. You can register as many mutation/crossover operators as you like. Please check the Toolbox documentation for more details.
Attention
Here you may notice toolbox.pbs['mut_uniform'] = 1. Why do we set a mutation probability of 1? Is it too high? Please note that the builtin mutate_uniform() operator has its own probability control with the argument ind_pb, which is suggested to be equal to two point mutations across the whole chromosome. We have set this previously by toolbox.register('mut_uniform', gep.mutate_uniform, pset=pset, ind_pb=2 / (2 * h + 1)). Thus, toolbox.pbs['mut_uniform'] = 1 only means for each individual it is assured that the mutate_uniform() operator is applied. It is still possible that no mutation actually happens due to the smal ind_pb.
In the above, the roulette wheel selection is done with the DEAP deap.tools.selRoulette() method and the remaining operators for genetic manipulation in GEP are all provided in geppy.
Note
Unlike Genetic programming in DEAP, generally there is NO need to to handle Tree Size Limit and Bloat Control explicitly in geppy for GEP. The reason is obvious: the fixed-length chromosome representation in GEP actually places a limit on the maximum depth of trees it can produce. Besides, as shown in literature, though GP tends to grow very deep trees (called bloat), GEP often generates only small trees due to the multigenic nature of chromosomes in GEP.
Logging statistics
It is import to monitor the progress of an evolutionary program since it usually takes a long time for a complicated problem. There is no need for geppy to provide its own logging functionality, because it is completely compatible with DEAP. As a result, we can rely on the logging and statistics infrastructure of DEAP. In the next code, we define some statistics to be watched, including the min/max fitness in each generation and the average/standard deviation of each generation’s fitness using the numpy package:
stats = tools.Statistics(key=lambda ind: ind.fitness.values[0])
stats.register("avg", numpy.mean)
stats.register("std", numpy.std)
stats.register("min", numpy.min)
stats.register("max", numpy.max)
The calculation and logging of such statistics are automatically done by the builtin geppy algorithms. Of course, you can do that manually when writing your own GEP algorithms instead of using the builtin ones. Just refer to logging and statistics for details.
GEP algorithms
After we finish all the above preparations, the last step is just to launch the evolution. For many problems, the builtin algorithms in geppy may be enough, or at least a good starting point.
Hall of fame
In certain applications, we may want to keep the best individuals in the whole evolution history rather than only the best ones in the last generation. This is easily achieved with the deap.tools.HallOfFame class. For example, if we want the keep the best three individuals ever found, we can define
hof = tools.HallOfFame(3)
Launch evolution
We use the standard and simplest gep_simple() algorithm to perform GEP as follows
# size of population and number of generations
n_pop = 100
n_gen = 100

pop = toolbox.population(n=n_pop)

# start evolution
pop, log = gep.gep_simple(pop, toolbox, n_generations=n_gen, n_elites=1,
        stats=stats, hall_of_fame=hof, verbose=True)
We only need to specify and tune the probability of certain operators. Besides, elitism is highly recommended in GEP and that’s why we set n_elites=2. By setting verbose=True, the statistics information will be printed in real time during evolution.
Postprocessing: model simplification and tree visualization
After the GEP evolution finishes, we can get the best individual (i.e., the best solution) best. Sometimes, the expression of the individual may involve a lot of redundancies. For example, \(x * x + 3 * y - y + (10 - 2) / 4\) is just \(x*x + 2*y +2\). However, the GEP evolution cannot realize this fact and thus the result we get are generally not simplified. geppy has provided a convenient function simplify() to perform symbolic simplification of the individual (solution)
best_individual = hof[0]
solution = gep.simplify(hof[0])
print(solution)
Furthermore, we know that in GEP a chromosome can be translated into an expression tree (called a syntax tree in GP). We can visualize such a tree with the function export_expression_tree() to generate a tree image like the one at the start of this tutorial
rename_labels = {'add': '+', 'sub': '-'}
gep.export_expression_tree(best_individual, rename_labels, file='tree.png')
Here, instead of the original names ‘add’ and ‘sub’, we want them to be displayed as symbols ‘+’ and ‘-’ in the tree by specifying the argument rename_labels. The tree graph is rendered into the file ‘tree.png’ in the current directory.
What’s next?
This primer introduces the most common features of geppy, but there are a lot more to explore. You can first check how to apply these features in practice by going through the example on Boolean function identification using GEP with geppy, which is commented in details.
After that, you can refer to Tutorials & Examples to learn more about geppy applications in different fields of GEP. More importantly, the documentation of all the public interfaces of geppy can be found at Library Reference.